
Automate Building, Testing and Deploying SharePoint Framework Projects with Azure Pipelines in Four Steps
In just four simple steps, this post will show you how to automate the build, test & deployment to SharePoint Online of any SharePoint Framework project using Azure Pipelines. I guarantee you can have it done before your coffee is ready! Seriously… go get the pot going and come back to this post.
DevOps is all the rage these days. Developers throw it in resumes left and right & the recruiters are always searching for someone who can check that box. But what’s funny is like every other hot term these days, people use the term for everything.
You know… the manager who said to you recently:
“Can you containerize our DevOps in the cloud to be agile using a SPA and double clicking on the North Star?”


Let’s get back on track…
One aspect of it is automating the build, test and deployment phase of a project. If you take a SharePoint Framework project, for instance, the steps are:
- build the project
- run the automated tests for the project (you DO have tests, don’t you?)
- deploy the project to dev|shared dev|stating|qa|production
As a SharePoint Framework developer, you already know these steps. Better yet, they are all very predictable!
SharePoint Framework projects are predictable
Building a SharePoint Framework project, and by doing that I mean getting the artifact you need for production, is the same no matter what you’re building.
gulp build
gulp bundle --ship
gulp package-solution --ship
Testing is the same! Just run gulp test… if it fails, you have something to fix.
Deployment is the same as well. You take the *.sppkg file, upload it to an app catalog and deploy it.
Now… how do you automate this…
Azure Pipelines
Azure DevOps (what used to be VSTS), provides a way to do this. It’s called Azure Pipelines. In the past, this was broken down into two stages: building & releasing.
The build stage was something you could define using YAML files or using a web-based designer that generated the YAML file. Releases could only be defined using the designer tool. The SharePoint Framework docs show you how to create an automation pipeline using these tools: Implement Continuous Integration and Continuous deployment using Azure DevOps
While that’s one way to do it, I prefer a newer way that Microsoft is pushing: 100% declarative using Azure YAML Pipelines
Azure YAML Pipelines
I like this approach so much more for two reasons:
Azure YAML Pipelines are more flexible
First, it's much more flexible than the previous approach. Now, builds and releases are all in one bucket. What signifies a release is using a particular type of job, a deployment job. Builds just contain jobs.
The way its setup is that you have stages which contain jobs which contain tasks (or steps). You can have multiple steps in a job, multiple jobs in a stage, and multiple stages in a pipeline.
For instance, the build stage of a SharePoint Framework project may be:
- checkout the latest code
- install all dependencies:
npm install - build the project:
gulp build - create the bundle and manifest for the project:
gulp bundle --ship - create the *.sppkg file:
gulp package-solution --ship
That’s five steps in a single job in a single stage.
You may have another stage that does testing as well. If both of these pass, then you want to move onto the deployment stage. Stages can be dependent on each other, so if the build or tests fail, I don’t want to deploy it. Instead, you want to shame the developer who broke the build!

Azure YAML Pipelines can be made into a template
The other thing I like about YAML pipelines is you can make things repeatable. Once you’ve defined your process, you can use it over and over. All you have to do is to define things that are repeatable.
Think about it… what is different from building, testing & deploying your SharePoint Framework project than from my SharePoint Framework project? Just three things:
- the name of the project (as that defines the *.sppkg filename)
- the site you want to deploy it to
- the credentials of the account used to deploy it in SharePoint Online
And I’m happy to say, as the Jest presents for SharePoint Framework projects that I created, which you can learn more about in my post Enable Jest testing of SharePoint Framework Projects in One Simple Step, I’ve made adding this to your projects just as easy!
Announcing Azure YAML Pipelines for SPFx Projects
I’ve created a project take takes advantage of the templating capability of Azure YAML pipelines making it incredibly easy for you to automate the build-test-deploy your project.
To create an Azure YAML pipeline, you drop a file azure-pipelines.yml into your project. Here you define your stages, jobs, and steps. But, before you go creating all the jobs and steps, let me save you some time.
The pipeline definition file can reference job template files. These job templates can live within the same project, or they can live in a remote git repository! And that’s where this comes in.
The public repo Voitanos/azure-pipelines-spfx-templates contains templates you can use in your project.
All you have to do is reference these in your azure-pipelines.yml project. To do this, add a resource to the YAML file:
For this to work, you need to create a service connection from your Azure DevOps account to Github. That’s documented here: Azure DevOps Services > Azure Pipelines > Service Connections.
Once you’ve done that, you can reference the job templates that project contains in your pipeline:
Each template contains different inputs you can specify. For instance, the one above lets you specify if you want to use Yarn instead of NPM for your package manager.
The deployment stage is where you’ll want to set the credentials for the account that will upload and deploy the package to the app catalog. I do that using a variable group to keep credentials out of the YAML pipeline. I also put the URL of the site (or sites) where I want to deploy the package to.
But you said four simple steps?
Maybe it wasn’t clear, but there are only three simple steps to perform to get your project up and running:
- create a service connection to GitHub un your Azure DevOps account
- create a variable group with the credentials of the account & URL of the site(s) to deploy the package to
- drop in an azure-pipelines.yml into your project
- add the pipeline to your Azure DevOps project by selecting the azure-pipelines.yml file in the project
This takes only 3-4 minutes… it can’t be easier!
The template repo, Voitanos/azure-pipelines-spfx-templates, contains a sample project so you can see what the full azure-pipelines.yml file looks like.
I use this project to verify the templates are working when I make updates to it.
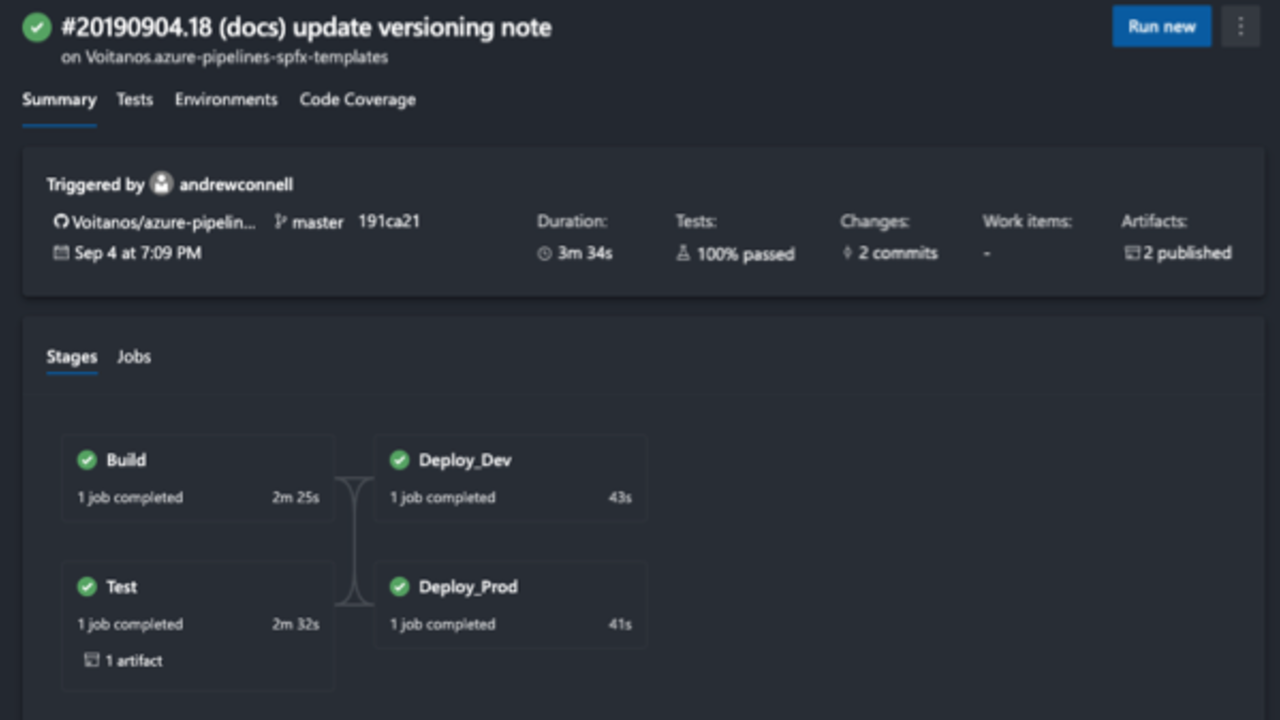
Here’s what it looks like once I added it to the project I created in my Azure DevOps instance:


And just in case it isn’t clear, here’s what the variable group looks like:


Interested in kicking the tires and trying it out on your SPFx project? Cool… take a look at the README in the template project as it contains complete documentation on all the parameters each job template supports and the details steps to get this in your SPFx project.